mysql安装
3安装Mariadb数据库 (默认端口 3306)
(1)安装数据库mariadb-server
yum install mariadb-server -y
(2) 开启启动
systemctl start mariadb
systemctl enable mariadb
netstat -tunlp
(3)配置登录密码 默认用户root
mysqladmin password ‘123456’
测试登录: mysql -uroot -p123456

show databases; # 查看当前有哪些库
create database hehe; # 创建hehe库
drop database hehe; # 删除hehe库
quit # 退出
--问题--
Access denied for user 'root'@'localhost' (using password: YES)
怎么办?

[root@web01 /]# mysqladmin password '123456'
mysqladmin: connect to server at 'localhost' failed
error: 'Access denied for user 'root'@'localhost' (using password: NO)'
第一步就是跳过MySQL的密码认证过程
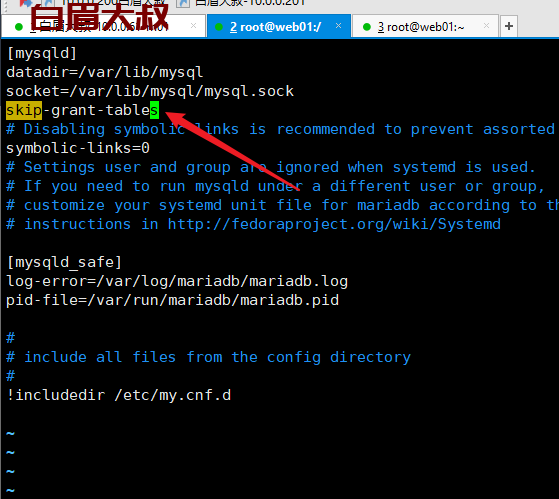
第一步:
#vim /etc/my.cnf
在文档内搜索mysqld定位到[mysqld]文本段:
/mysqld(在vim编辑状态下直接输入该命令可搜索文本内容)
在[mysqld]后面任意一行添加“skip-grant-tables”用来跳过密码验证的过程,如下图所示:
然后重启 systemctl restart mariadb
然后再输入# mysql -u root -p。一直按enter就可以顺利进入数据库
进入数据库后
依次输入以下命令:
show databases;
use mysql;
select *from user;
3.创建一个新的登陆用户:
3.1.创建root用户
mysql> create user 'root'@'localhost' identified by '123456';
1
localhost表示本地,mysql登入的时候,不用指定ip登入
此步骤可能会报以下错误,没报错的跳过(直接到权限那一步),用一下方法解决:
mysql> ERROR 1290 (HY000): The MySQL server is running with the --skip-grant-tables option so it cannot execute this statement

#输入
mysql> flush privileges;刷新配置
此时再次重新创建用户:
mysql>
create user 'root'@'localhost' identified by '123456';

再次报错,这步没报错的也是直接跳到赋予权限那一步,报错的以下操作:
mysql> drop user 'root'@'localhost';

再次重新创建用户:
mysql> create user 'root'@'localhost' identified by '123456';
结果没有再报错,root用户创建成功。

3.2.赋予root权限
mysql> GRANT ALL PRIVILEGES ON *.* TO 'root'@'localhost' WITH GRANT OPTION;
#赋予所有库所有表操作权限

mysql> flush privileges;
mysql> exit;
我们测试一下:
mysql -u root -p123456
user mysql;
使用select user ,password from user;查询,你会发现user表中新建了一个root用户

到这一步没有报错,表明已经成功了
4.恢复最开始的配置文件
# vim /etc/my.cnf
删除配置文件中的:
skip-grant-tables
5.退出,重启mysql
systemctl restart mariadb
然后登录测试:
mysql -u root -p123456
欢迎来撩 : 汇总all