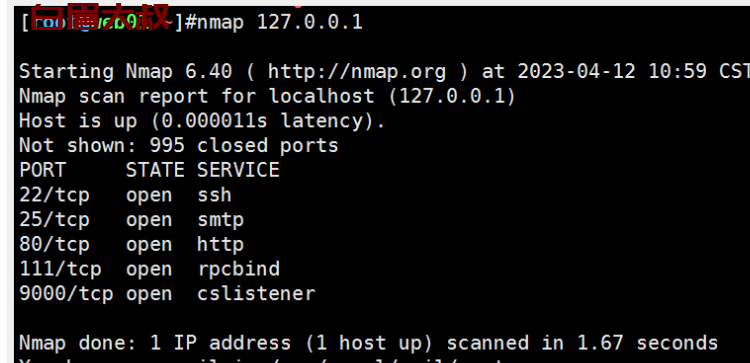
namp 获取本机开放端口
NMap 使用技巧总结
一、主机发现
1. 全面扫描/综合扫描
nmap -A 192.168.1.103
2. Ping 扫描
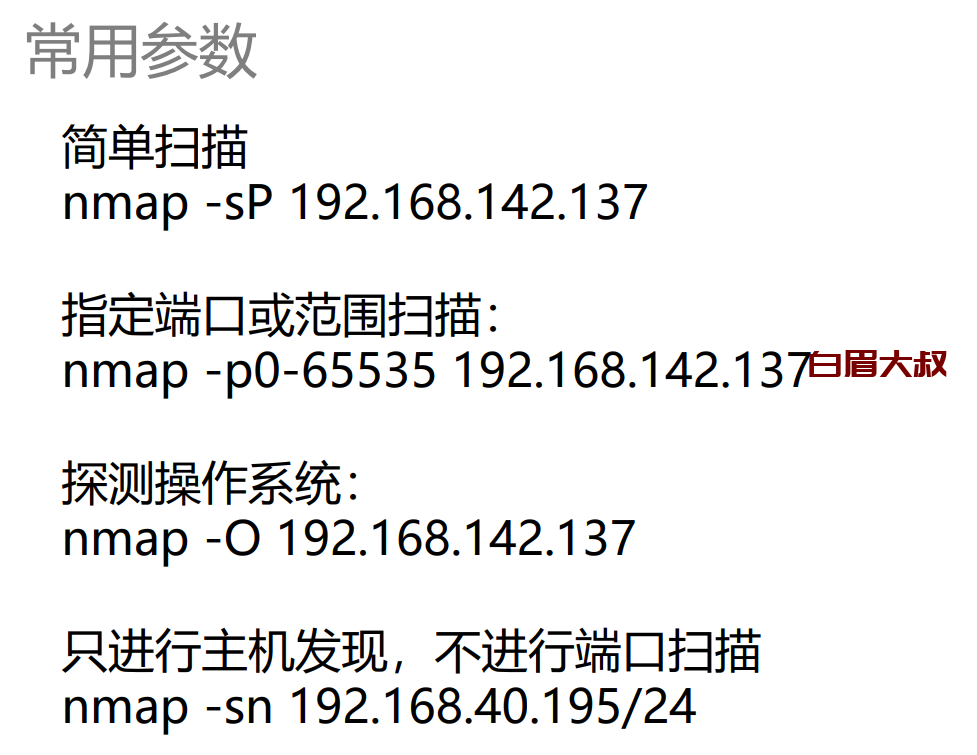
nmap -sP 192.168.1.1/24
3. 免 Ping 扫描,穿透防火墙,避免被防火墙发现
nmap -P0 192.168.1.103
4. TCP SYN Ping 扫描
nmap -PS -v 192.168.1.103
nmap -PS80,10-100 -v 192.168.1.103 (针对防火墙丢弃 RST 包)
5. TCP ACK Ping 扫描
nmap -PA -v 192.168.1.103
6. UDP Ping 扫描
nmap -PU -v 192.168.1.103
7. ICMP Ping Types 扫描
nmap -PU -v 192.168.1.103 (ICMP ECHO)
nmap -PP -v 192.168.1.103 (ICMP 时间戳)
nmap -PM -v 192.168.1.103 (ICMP 地址掩码)
8. ARP Ping 扫描
nmap -PR -v 192.168.1.103
9. 列表 扫描
nmap -sL -v 192.168.1.103
10. 禁止方向域名解析
nmap -n -sL -v 192.168.1.103
11. 方向域名解析
nmap -R -sL -v 192.168.1.103
12. 使用系统域名解析系统
nmap --system-dns 192.168.1.2 192.168.1.103
13. 扫描 IPV6 地址
nmap -6 IPv6
14. 路由跟踪
nmap --traceroute -v www.sunbridgegroup.com
15. SCTP INIT Ping 扫描
nmap -PY -v 192.168.1.103
二、端口扫描
1. 时序扫描
nmap -T(0-5) 192.168.1.103
2. 常用扫描方式
nmap -p 80 192.168.1.103
nmap -p 80-100 192.168.1.103
nmap -p T:80,U:445 192.168.1.103
nmap -F 192.168.1.1.103 (快速扫描)
nmap --top-ports 100 192.168.1.103 (扫描最有用的前 100 个端口)
3. TCP SYN 扫描 (高效的扫描方式)
nmap -sS -v 192.168.1.103
4. TCP 连接扫描
nmap -sT -v 192.168.1.103
5. UDP 连接扫描
nmap -sU -p 80-100 192.168.1.103
6. 隐蔽扫描
nmap -sN 61.241.194.153(NULL 扫描)
nmap -sF 61.241.194.153(FIN 扫描)
nmap -sX 61.241.194.153(Xmas 扫描)
7. TCP ACK 扫描
nmap -sA 192.168.1.103
8. TCP 窗口扫描
nmap -sW -v -F 192.168.1.103
9. TCP Maimon 扫描
nmap -sM -T4 192.168.1.103
10. 自定义 扫描
nmap -sT --scanflags SYNURG 192.168.1.103
11. 空闲 扫描( 隐藏 IP )
nmap -sI www.0day.co:80 192.168.1.103
12. IP 协议 扫描
nmap -sO -T4 192.168.1.103
13. FTP Bounce 扫描
(已经不被支持)
三、指纹识别与探测
1. 版本探测
nmap -sV 192.168.1.103
nmap -sV -A 192.168.1.103
2. 全端口版本探测
nmap -sV --allports 192.168.1.103
3. 设置扫描强度
nmap -sV --version-intensity (0-9) 192.168.1.103
4. 轻量级扫描
nmap -sV --version-light 2 192.168.1.103
5. 重量级扫描
nmap -sV --version-all 192.168.1.103
6. 获取详细版本信息
nmap -sV --version-trace 192.168.1.103
7. RPC 扫描
nmap -sS -sR 192.168.1.103
8. 对指定的目标进行操作系统监测
nmap -O --osscan-limit 192.168.1.103
9. 推测系统并识别
nmap -O --osscan-guess 192.168.1.103
四、伺机而动
1. 调整并行扫描组的大小
nmap --min-hostgroup 30 192.168.1.110/24
nmap --max-hostgroup 30 902 192.168.1.104
2. 调整探测报文的并行度
nmap --min-parallelism 100 192.168.1.104
nmap --max-parallelism 100 192.168.1.104
3. 调整探测报文超时
nmap --initial-rtt-timeout 100ms 192.168.1.104
nmap --max-rtt-timeout 100ms 192.168.1.104
nmap --min-rtt-timeout 100ms 192.168.1.104
4. 放弃缓慢的目标主机
nmap --host-timeout 1800000ms 192.168.1.104
5. 调整报文适合时间间隔
nmap --scan-delay 1s 192.168.1.104
nmap --max-scan-delay 1s 192.168.1.104
五、防火墙/IDS 逃逸
1. 报文分段
nmap -f -v 61.241.194.153
2. 指定偏移大小
nmap --mtu 16 192.168.1.104
3. IP 欺骗
nmap -D RND:11 192.168.1.104
nmap -D 192.168.1.104,192.168.1.103,192.168.1.101 192.168.1.104
4. 源地址欺骗
nmap -sI www.0day.cn:80 192.168.1.104
5. 源端口欺骗
nmap --source-port 902 192.168.1.104
6. 指定发包长度
nmap --data-length 30 192.168.1.104
7. 目标主机随机排序
nmap --randomize-hosts 192.168.1.104
8. MAX 地址欺骗
nmap -sT -Pn --spoof-mac 0 192.168.1.104
六、信息收集
1. IP 信息收集
nmap --script ip-geolocation-* www.pcos.cn
2. WHOIS 查询
nmap --script whois-domain www.pcos.cn
nmap --script whois-domain --script-args whois.whodb=nofollow
www.ithome.com
nmap -sn --script whois-domain -v -iL host.txt
3. 搜索邮件信息(新版可能没有这个模块)
nmap --script http-email-harvest www.pcos.cn
4. IP 反查
nmap -sn --script hostmap-ip2hosts www.pcos.cn
5. DNS 信息收集
nmap --script dns-brute www.pcos.cn
nmap --script dns-brute dns-brute.threads=10 www.pcos.cn
nmap --script dns-brute dns-brute.threads=10,dns-brute.hostlis
www.pcos.cn
6. 检索系统信息
nmap -p 445 445 192.168.1.104 --script membase-http-info
7. 后台打印机服务漏洞
nmap --script smb-security-mode.nse -p 445 119.29.155.45
8. 系统漏洞扫描
nmap --script smb-check-vulns.nse -p 445 119.29.155.45
9.扫描 Web 漏洞
nmap -p80 --script http-stored-xss.nse/http-sql-injection.nse
119.29.155.45
10. 通过 Snmp 列举 Windows 服务/账户
nmap -sU -p 161 --script=snmp-win32-services 192.168.1.104
nmap -sU -f -p 161 --script=snmp-win32-users 192.168.1.110
11. 枚举 DNS 服务器的主机名
nmap --script dns-brute --script-args dns-brute.domain=baidu.com
12. HTTP 信息收集
nmap -sV -p 80 www.0day.com (HTTP 版本探测)
nmap -p 80 --script=http-headers www.pcos.cn (HTTP 信息头探测)
nmap -p 80 --script=http-sitemap-generator www.pcos.cn (爬行 Web 目
录结构)
13. 枚举 SSL 密钥
nmap -p 443 --script=ssl-enum-ciphers www.baidu.com
14. SSH 服务密钥信息探测
map -p 22 --script ssh-hostkey --script-args ssh_hostkey=full 127.0.0.1
七、数据库渗透测试
1. Mysql 列举数据库
nmap -p3306 --script=mysql-databases --script-args
mysqluser=root,mysqlpass 192.168.1.101
2. 列举 MySQL 变量
nmap -p3306 --script=mysql-variables 192.168.1.3
nmap -sV --script=mysql-variables 192.168.1.3 (无法确定端口的情况下)
3. 检查 MySQL 密码
nmap -p3306 --script=mysql-empty-password 192.168.1.3
nmap -sV -F -T4 --script=mysql-empty-password 192.168.1.3
4. 审计 MySQL 密码
nmap --script=mysql-brute 192.168.1.101
nmap -p3306 --script=mysql-brute userdb=/root/passdb.txt
passdb=/root/pass.txt 192.168.1.101 (指定字典)
5. 审计 MySQL 安全配置
nmap -p3306 --script mysql-audit --script-args "mysql-audit.username='root',mysql-audit.password='123',mysql-audit.fi
lename='nselib/data/mysql-cis.audit'" 192.168.1.104
6. 审计 Oracle 密码
nmap --script=oracle-brute -p 1521 --script-args oracle-brute.sid=test
192.168.1.121
nmap --script=oracle-brute -p 1521 --script-args oracle-brute.sid=test
--script-args userdb=/tmp/usernames.txt,passdb=/tmp/password.txt
192.168.1.105
7. 审计 msSQL 密码
nmap -p 1433 --script ms-sql-brute --script-args
userdb=name.txt,passdb=pass.txt 192.168.1.104
8. 检查 msSQL 空密码
nmap -p 1433 --script ms-sql-empty-password 192.168.1.104
9. 读取 msSQL 数据
nmap -p 1433 --script ms-sql-tables --script-args
mssql.username=sa,mssql.Password=sa 192.168.1.101
10. 读取 msSQL 执行系统命令
nmap -p 1433 --script ms-sql-xp-cmdshell --script-args
mssql.username=sa,mssql.password=sa,ms-sql-xp-cmdshell.cmd="ipconf
ig" 192.168.1.101
11. 审计 PgSQL 密码
nmap -p 5432 --script pgsql-brute 192.168.1.101
八、渗透测试
1. 审计 HTTP 身份验证
nmap --script=http-brute -p 80 www.pcos.cn
2. 审计 FTP 服务器
nmap --script ftp-brute -p 21 192.168.1.101
nmap --script ftp-brute --script-args userdb=user.txt,passdb=pass.txt -p
21 192.168.1.101
nmap --script=ftp-anon 192.168.1.101
3. 审计 WordPress 程序
nmap -p80 --script http-wordpress-brute 192.168.1.110
nmap -p80 --script http-wordpress-brute --script-args
userdb=user.txt,passdb=passwd.txt 192.168.1.110
nmap -p80 --script http-wordpress-brute --script-args
http-wordpress-brute.threads=10 192.168.1.110
4. 审计 Joomla 程序
nmap -p80 --script http-joomla-brute 192.168.1.110
nmap -p80 --script http-joomla-brute --script-args
uesrdb=user.txt,passdb=passwd.txt 192.168.1.110
nmap -p80 --script http-joomla-brute --script-args
uesrdb=user.txt,passdb=passwd.txt,http-joomla-brute.threads=5
192.168.1.110
5. 审计 邮件服务器
nmap -p110 --script=pop3-brute 192.168.1.110
6. 审计 SMB 口令
nmap --script smb-brute.nse -p 445 192.168.1.110
nmap --script smb-brute.nse --script-args passdb=pass.txt -p 445
192.168.1.110
7. 审计 VNC 服务
nmap --script vnc-brute -p 5900 192.168.1.110
8. 审计 SMTP 服务器
nmap -p 25 --script smtp-brute 192.168.1.110
nmap -p 25 --script=smtp-enum-users.nse smith.jack.com (枚举远程系
统所有用户)
9. 检测 Stuxnet 蠕虫
nmap --script stuxnet-detect -p 445 192.168.1.110
10. SNMP 服务安全审计
nmap -sU -p 161 --script=snmp-netstat 192.168.1.101 (获取目标主机网
络连接状态)
nmap -sU -p 161 --script=snmp-processes 192.168.1.110 (枚举目标主机
的系统进程)
nmap -sU -p 161 --script=snmp-win32-services 192.168.1.110 ( 获 得
windows 服务器的服务)
nmap -sU -p 161 --script snmp-brute 192.168.1.110
九、Zenmap
1. Intense scan (详细扫描)
nmap -T4 -A -v 192.168.1.101
2. Intense scan plus UDP (UDP 扫描经典使用)
nmap -sS -sU -T4 -A -v 192.168.1.101
3. Intense scan, all TCP ports (TCP 扫描)
nmap -p 1-65535 -T4 -A -v 192.168.1.101
4. Intense scan, no ping (无 Ping 扫描)
nmap -T4 -A -v -Pn 192.168.1.101
5. Ping scan (Ping 扫描)
nmap -sn 192.168.1.101/24
6. Quick scan
nmap -T4 -F 192.168.1.101/24
7. Quick scan plus
nmap -sV -T4 -O -F --version-light 192.168.1.101/24
8. Quick traceroute
nmap -sn --traceroute 192.168.1.101
9. Regular scan
nmap 192.168.1.101
10. Slow comprehensive scan
nmap -sS -sU -T4 -A -v -PE -PP -PS80,443 -PA3389 -PU40125 -PY -g 53
--script "default or (discovery and safe)" 192.168.1.101
十. Nmap 技巧
1. 发送以太网数据包
nmap --send-eth 192.168.1.111
2. 网络层发送
nmap --send-ip 192.168.1.111
3. 假定拥有所有权
nmap --privileged 192.168.1.111
4. 在交互模式中启动
nmap --interactive
5. 查看 Nmap 版本号
nmap -V
6. 设置调试级别
nmap -d (1-9) 192.168.1.111
7. 跟踪发送接收的报文
nmap --packet-trace -p 20-30 192.168.1.111
8. 列举接口和路由
nmap --iflist www.iteye.com
9. 指定网络接口
nmap -e eth0 192.168.1.111
10. 继续中断扫描
nmap -oG 1.txt -v 192.168.126.1/24
nmap --resume 1.txt (继续扫描)
11. Dnmap
dnmap_server -f test (指定命令脚本)
dnmap_client -s 192.168.1.107 -a test
12. 编写 Nse 脚本
(1) -- The scanning module -- author = "Wing" categories = {"version"}
portrule = function(host,port)
return port.protocol == "tcp" and port.number == 80 and
port.state == "open" end
action = function(host,port)
return "Found!!!" end
(2) -- The scanning module -- author = "Wing" categories = {"version"}
local comm=require "comm"
require "shortport"
local http=require "http" portrule = function(host,port)
return (port.number == 80) and (port.start=="open")
end
action = function(host,port)
local uri = "/admin.php"
local response = http.get(host,port,uri)
return "Found!!!" end
13. 探测防火墙
nmap --script=firewalk --traceroute 192.168.1.111
14. VMware 认证破解
nmap -p 902 --script vmauthd-brute 192.168.1.107
十一. Nmap 的保存和输出
1. 标准保存
nmap -F -oN d:/test1.txt 192.168.1.111
2. XML 保存
nmap -F -oX d:/test1.xml 192.168.1.111
3. 133t 保存
nmap -F -oS d:/test2.txt 192.168.1.111
4. Grep 保存
nmap -F -oG d:/test2.txt 192.168.1.111
5. 保存到所有格式
nmap -F -oA d:/test2 192.168.1.111
6. 补充保存文件
nmap -F -append-output -oN d:/test2.txt 192.168.1.111
7. 转换 XML 保存
nmap -F -oX testB.xml --stylesheet
http://www.insecure.org/nmap/data/nmap.xsl 192.168.1.111
8. 忽略 XML 声明的 XSL 样式表
nmap -oX d:/testC.xml --no-stylesheet 192.168.1.111
欢迎来撩 : 汇总all