创建目录
/backup
修改目录权限属主属组www
4)启动rsync服务
systemctl start rsyncd
systemctl enable rsyncd
-----------------------------------------------
2.将rsync写入到ansible主机清单(记得先恢复快照)
[root@ansible ~]# ssh-copy-id -i .ssh/id_rsa.pub 10.0.0.41
[root@ansible ~]# cat /etc/ansible/hosts
[nfs]
10.0.0.31
[webs]
web01 ansible_ssh_host=10.0.0.7
web02 ansible_ssh_host=10.0.0.8
[backups]
backup ansible_ssh_host=10.0.0.41
测试ping
[root@ansible ~]# ansible backup -m ping
backup | SUCCESS => {
"ansible_facts": {
"discovered_interpreter_python": "/usr/bin/python"
},
"changed": false,
"ping": "pong"
}
3.通过ansible单条命令实现远程部署rsync服务
1)安装rsync 使用yum模块
语法:
ansible backup -m 指定模块名 -a 具体动作
[root@ansible ~]# ansible backup -m yum -a 'name=rsync state=present'
卸载rsync服务:
[root@ansible ~]# ansible backup -m yum -a 'name=rsync state=absent'
yum模块:
name: 指定软件的名称
state: 状态
present: 安装软件
absent: 卸载软件
2)配置rsync服务端
---------------------
第二个模块: copy模块
copy:
src: 源文件
dest: 目标位置
owner: 属主
group: 属组
mode: 权限
content: 将content后面的字符串写入到dest目标文件中
backup: yes 复制前先将dest目标的文件进行备份
拷贝后修改属主属组权限
[root@ansible ~]# ansible backup -m copy -a "src=1.txt dest=/root/ owner=ntp group=ntp mode=777"
拷贝文件文件并修改名称:
[root@ansible ~]# ansible backup -m copy -a "src=1.txt dest=/root/hehe.txt"
content测试:
[root@ansible ~]# ansible backup -m copy -a "content=bakcup:123456 dest=/etc/rsync.pass mode=600"
备份目标文件:
[root@ansible ~]# ansible backup -m copy -a "src=1.txt dest=/root/hehe.txt backup=yes"
--------------------------------------------
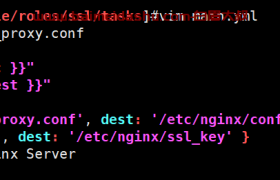
将rsync配置文件拷贝到目标位置/etc/rsyncd.conf
[root@ansible ~]# ansible backup -m copy -a 'src=rsyncd.conf dest=/etc/rsyncd.conf'
3)根据配置文件创建必要数据
创建用户:
第三四个模块: group user模块
group:
name: 组的名称
gid: 组id
state: present 和 absent
user:
name: 用户名称
uid: 666 指定uid号码
group: www 不指定数字 指定组名称
shell: /sbin/nologin 或者 /bin/bash
create_home: false # 默认为true 创建 false不创建
state: present 创建
state: absent 删除
[root@ansible ~]# ansible backup -m group -a 'name=www gid=666 state=present'
创建用户:
[root@ansible ~]# ansible backup -m user -a 'name=www uid=666 group=www shell=/sbin/nologin create_home=false state=present'
将密码文件写入到目标位置一定要和配置文件相同: /etc/rsync.passwd
[root@ansible ~]# ansible backup -m copy -a 'content=rsync_backup:123456 dest=/etc/rsync.passwd mode=0600'
第五个模块: file
file:
path: 文件或目录的路径
state: touch 创建文件
directory 创建目录
link 创建软链接
absent 删除
创建普通文件
[root@ansible ~]# ansible backup -m file -a 'path=/root/a.txt state=touch
创建并修改属主属组权限
[root@ansible ~]# ansible backup -m file -a 'path=/root/a.txt state=touch owner=www group=www mode=0600'
创建目录
[root@ansible ~]# ansible backup -m file -a 'path=/root/baimei state=directory'
递归修改属主属组
[root@ansible ~]# ansible backup -m file -a 'path=/root/baimei state=directory owner=www group=www recurse=yes'
删除文件或者目录 absent
[root@ansible ~]# ansible backup -m file -a 'path=/root/a.txt state=absent'
创建/backup并修改属主属组
[root@ansible ~]# ansible backup -m file -a 'path=/backup state=directory owner=www group=www'
4)启动服务
[root@ansible ~]# ansible backup -m systemd -a 'name=rsyncd state=started enabled=yes'
第六个模块: systemd模块
systemd:
name: 服务名称
state:
started: 启动
stopped: 停止
restarted: 重启
reloaded: 重新加载
enabled: yes 开机自动启动
enabled: no 开机禁止启动
客户端推送数据测试:
欢迎来撩 : 汇总all